A grid layout is an amazing way to display any blog posts, team members, portfolios, images, testimonials, or some other stuff in an appealing and concise way. It helps users to navigate your site and have a positive experience.
Although several WordPress themes come with grid-based layouts, there are chances that you may be using a WordPress theme that has no grid layout to display your posts.
Table of Contents
A brief overview of Grid-Style in Modern Web Design
The grid design style, which became popular with the Windows 8 interface, is being used extensively in modern web design. It is a simple, intuitive and easy design trend that you can implement on your site easily and help visitors to get all important information above the fold. It allows you to present multiple conversion paths to visitors.
It may increase the conversion rate up to a great extent. But, you should not use too many options because they can confuse visitors and repel them away from your website/blog.
For example- The availability of two images on the right side of your website may cause information overload for viewers. It also makes the site complex also. If you display 2 images diagonally from each other, it creates a visually-appealing view and helps you to make the page simple & appealing.
So, do you want to add Grid Style layout to your WordPress site? If yes, then just have a look at procedures how to do that.
Although there are several WordPress Grid Plugins, we will use the Essential grid plugin to explain the matter. It’s a hot selling Grid plugin on CodeCanyon which offers a wide range of options, allowing you to implement various types of design elements and arrange blogs, posts, videos, images, clients, products, pricing tables, etc, beautifully.
Useful features such as skins and Visual Skin Builder gives you several options to customize the grid as per your specific needs. You can add animations to any element based on your specific requirements.
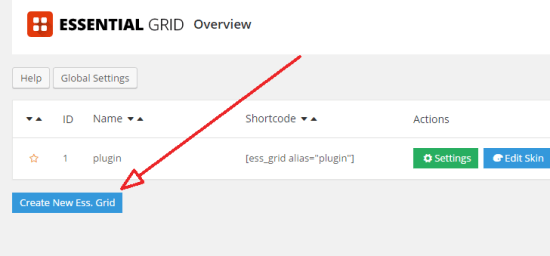
A. First of all, you need to install the plugin on your WordPress site. Once you activate the plugin, you need to click on the essential grid option on the left side menu bar to go to the essential grid dashboard.

You view a number of options on the Essential plugin dashboard. Just click on the “Create new essential grid” option and start creating a new essential grid. Once you are done, use the editor to customize the grid style, skin, and other elements.

Give A New Name To Your Grid
Once you complete the above-mentioned steps, use the essential grid editor to name your grid as per your wish.

Select the Grid Source:
As soon as you give a name to your new grid, you need to select the sources of the post of images in the “Source” option. They are as mentioned below:
| Post Type | Post/Page |
| Post Categories | Choose your tags and categories |
| Maximum Entries | The total number of grids you want to show |
| Set Source Order | Featured Image |

Grid Configuration
Now, you need to configure your grid. For this, go to the grid setting option, select the spacing, Padding, number of columns, pagination setting, Layout style, etc, as per your specific needs. For example-
Layout
- Layout: In accordance with your style
- Grid Layout: According to your style
- Items Ratio: X : Y
Columns
- Setting Mode: Simple/Advance
- Desktop Large: 3
- Medium: 3
- Small: 2
- Tablet: 2
- Mobile Landscape: 2
- Mobile: 1

- Skin Selection:
Here, you need to choose the skin from the Prebuild skins and background color.
Add Animation If You Need
If you want to add animation to your grids, you can do that in this section. Grid Animations and Hover Animations are the two options to perform this action
- Start and Filter Animations: According to your needs
- Animation Speed: 1000 ms
- Animation Delay: 1
- Hover Animations: 1
Save The Changes You Made In Grid
By now, you have prepared your grid. Just click on the green “Save” icon in the right to save the grid for using it on the posts and on other places in the future.

Add Grid to your Website
At last, you need to add a grid to the page or other places you want. You can do this easily by adding a shortcode on the page you want to add a grid. Just copy paste the following code in the page:

Final Words:
This is all that you need to create and add a grid to your WordPress site. Just follow the steps carefully and beautify your site by adding a well-customized grid to it.